> ## Documentation Index
> Fetch the complete documentation index at: https://docs.fanfare.io/llms.txt
> Use this file to discover all available pages before exploring further.
# Mobile WebView Integration
> Embed a Fanfare web integration in iOS and Android WebViews.
Use a mobile WebView when your native app wants to reuse the web SDK journey UI while keeping checkout, account state, and navigation under native app control.
The WebView should load a first-party page that integrates Fanfare. That page uses the React widget, web component, or core SDK, then sends high-level events to native code. Native code should pass admitted customers to your trusted checkout path without logging grants or placing them in URLs.
## Architecture
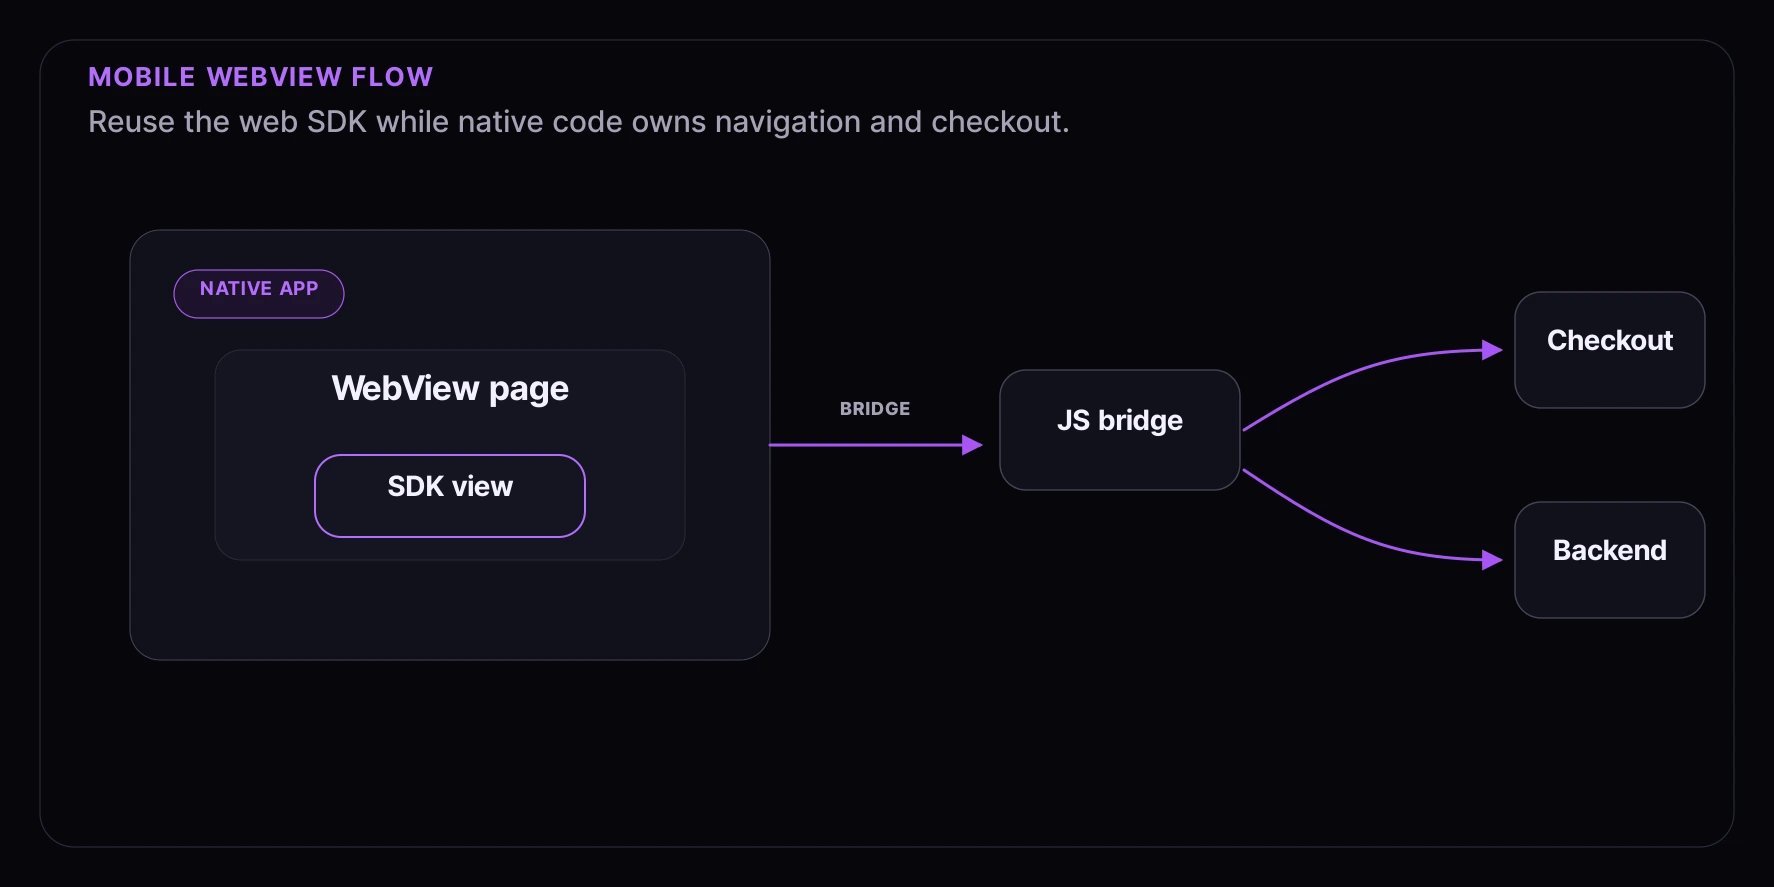 Takeaways:
* Keep the SDK in a normal browser page inside the WebView.
* Use a narrow bridge message for admission, errors, and navigation.
* Validate the admission handoff inside your app or backend before protected actions.
## Web Page Example
The hosted page can use the React widget.
```tsx theme={null}
import { FanfareProvider, ExperienceWidget } from "@fanfare-io/fanfare-sdk-react";
import "@fanfare-io/fanfare-sdk-react/styles";
export function MobileExperiencePage() {
return (
{
window.ReactNativeWebView?.postMessage(
JSON.stringify({ type: "fanfare:granted", admissionGrant })
);
}}
onError={(error) => {
window.ReactNativeWebView?.postMessage(
JSON.stringify({ type: "fanfare:error", message: error.message })
);
}}
/>
);
}
```
For a framework-agnostic page, use the web component events.
```html theme={null}
```
Do not send raw journey snapshots to native analytics. Send only the outcome or event your app needs.
## React Native WebView
```tsx theme={null}
import { WebView } from "react-native-webview";
export function FanfareWebView() {
return (
{
const message = JSON.parse(event.nativeEvent.data);
if (message.type === "fanfare:admitted") {
startNativeCheckout({ admissionGrant: message.admissionGrant });
}
if (message.type === "fanfare:error") {
showError(message.message);
}
}}
/>
);
}
```
Use the WebView storage mode that matches your app's session expectations. Test returning sessions, app restarts, and multiple tabs or windows where your platform supports them.
## iOS WKWebView
For iOS, add a message handler and parse the same bridge payload.
```swift theme={null}
let contentController = WKUserContentController()
contentController.add(context.coordinator, name: "fanfare")
let configuration = WKWebViewConfiguration()
configuration.userContentController = contentController
configuration.websiteDataStore = .default()
```
On the web page, post to the iOS bridge when present:
```ts theme={null}
window.webkit?.messageHandlers?.fanfare?.postMessage({
type: "fanfare:admitted",
admissionGrant,
});
```
The native handler should pass the grant to your app-owned checkout flow and avoid persisting it longer than needed.
## Android WebView
For Android, enable JavaScript and expose a narrow bridge.
```kotlin theme={null}
webView.settings.javaScriptEnabled = true
webView.settings.domStorageEnabled = true
webView.addJavascriptInterface(FanfareBridge(::startCheckout), "FanfareNative")
webView.loadUrl("https://shop.example.com/fanfare/mobile/exp_123")
```
The page can call the bridge when it exists:
```ts theme={null}
window.FanfareNative?.postMessage(
JSON.stringify({ type: "fanfare:admitted", admissionGrant })
);
```
Keep the bridge allowlist small. Handle only the message types your native app owns.
## Security And Privacy Checklist
* Load only your first-party Fanfare page in the WebView.
* Use HTTPS in production.
* Keep publishable credentials in the web page and secret credentials on your server.
* Send grants to your own app or backend, not to third-party logs.
* Do not encode grants in deep links.
* Show generic customer-safe error copy for gated or denied states.
## Testing
* Test a clean app install and a returning session.
* Test WebView reload, app backgrounding, and network interruption.
* Confirm bridge messages are handled once.
* Confirm native checkout receives only the values it needs.
* Confirm screenshots, crash reports, and analytics do not include grants or raw snapshots.
For broader test guidance, see [Testing Your Integration](/getting-started/testing).
Takeaways:
* Keep the SDK in a normal browser page inside the WebView.
* Use a narrow bridge message for admission, errors, and navigation.
* Validate the admission handoff inside your app or backend before protected actions.
## Web Page Example
The hosted page can use the React widget.
```tsx theme={null}
import { FanfareProvider, ExperienceWidget } from "@fanfare-io/fanfare-sdk-react";
import "@fanfare-io/fanfare-sdk-react/styles";
export function MobileExperiencePage() {
return (
{
window.ReactNativeWebView?.postMessage(
JSON.stringify({ type: "fanfare:granted", admissionGrant })
);
}}
onError={(error) => {
window.ReactNativeWebView?.postMessage(
JSON.stringify({ type: "fanfare:error", message: error.message })
);
}}
/>
);
}
```
For a framework-agnostic page, use the web component events.
```html theme={null}
```
Do not send raw journey snapshots to native analytics. Send only the outcome or event your app needs.
## React Native WebView
```tsx theme={null}
import { WebView } from "react-native-webview";
export function FanfareWebView() {
return (
{
const message = JSON.parse(event.nativeEvent.data);
if (message.type === "fanfare:admitted") {
startNativeCheckout({ admissionGrant: message.admissionGrant });
}
if (message.type === "fanfare:error") {
showError(message.message);
}
}}
/>
);
}
```
Use the WebView storage mode that matches your app's session expectations. Test returning sessions, app restarts, and multiple tabs or windows where your platform supports them.
## iOS WKWebView
For iOS, add a message handler and parse the same bridge payload.
```swift theme={null}
let contentController = WKUserContentController()
contentController.add(context.coordinator, name: "fanfare")
let configuration = WKWebViewConfiguration()
configuration.userContentController = contentController
configuration.websiteDataStore = .default()
```
On the web page, post to the iOS bridge when present:
```ts theme={null}
window.webkit?.messageHandlers?.fanfare?.postMessage({
type: "fanfare:admitted",
admissionGrant,
});
```
The native handler should pass the grant to your app-owned checkout flow and avoid persisting it longer than needed.
## Android WebView
For Android, enable JavaScript and expose a narrow bridge.
```kotlin theme={null}
webView.settings.javaScriptEnabled = true
webView.settings.domStorageEnabled = true
webView.addJavascriptInterface(FanfareBridge(::startCheckout), "FanfareNative")
webView.loadUrl("https://shop.example.com/fanfare/mobile/exp_123")
```
The page can call the bridge when it exists:
```ts theme={null}
window.FanfareNative?.postMessage(
JSON.stringify({ type: "fanfare:admitted", admissionGrant })
);
```
Keep the bridge allowlist small. Handle only the message types your native app owns.
## Security And Privacy Checklist
* Load only your first-party Fanfare page in the WebView.
* Use HTTPS in production.
* Keep publishable credentials in the web page and secret credentials on your server.
* Send grants to your own app or backend, not to third-party logs.
* Do not encode grants in deep links.
* Show generic customer-safe error copy for gated or denied states.
## Testing
* Test a clean app install and a returning session.
* Test WebView reload, app backgrounding, and network interruption.
* Confirm bridge messages are handled once.
* Confirm native checkout receives only the values it needs.
* Confirm screenshots, crash reports, and analytics do not include grants or raw snapshots.
For broader test guidance, see [Testing Your Integration](/getting-started/testing).