

Payment Processing Guide
Learn how to integrate payment processing with Fanfare admission flows for secure, validated transactions.Overview
When a consumer is admitted through Fanfare, they have a limited time window to complete their purchase. This guide covers integrating payment providers while validating admission status. What you’ll learn:- Validating admission before payment
- Integrating with Stripe, PayPal, and other providers
- Handling payment failures
- Securing the payment flow
Prerequisites
- Checkout Overview guide completed
- Payment provider account (Stripe, PayPal, etc.)
- Backend server for secure payment processing
Payment Flow Architecture
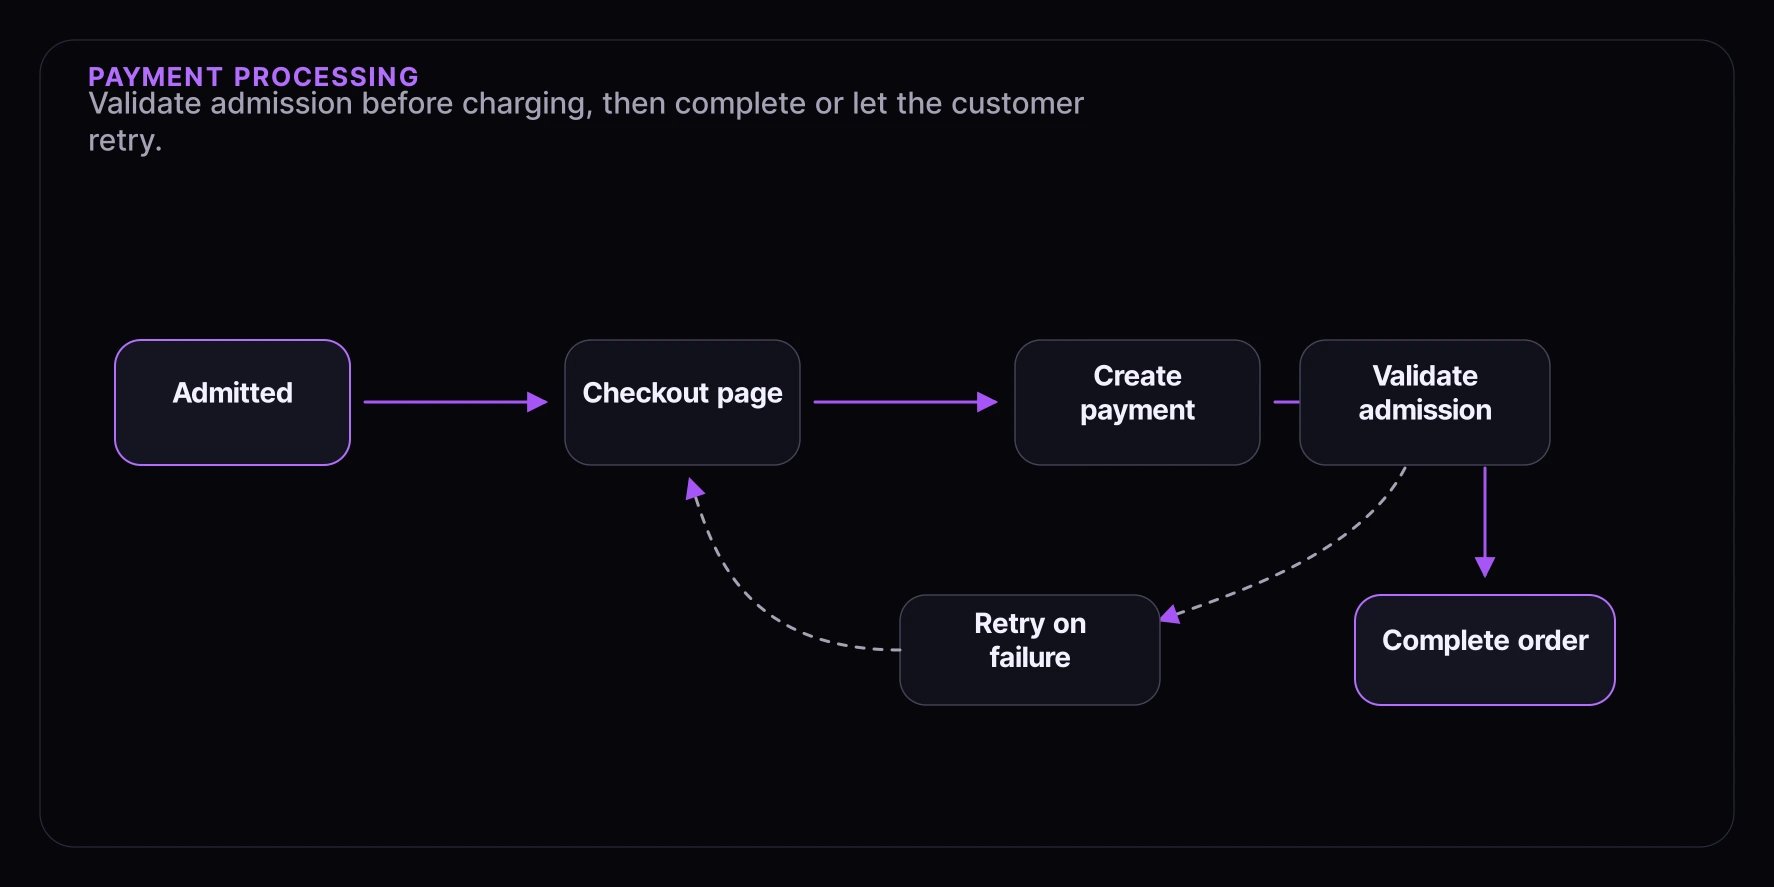
Stripe Integration
Fanfare-facing amounts should remain decimal strings such as"199.99". Convert to provider-specific minor units only when calling a payment provider, and use a currency-aware helper so zero-decimal currencies are handled correctly.
Step 1: Create Payment Intent with Admission Validation
// routes/payments.ts
import Stripe from "stripe";
import express from "express";

const stripe = new Stripe(process.env.STRIPE_SECRET_KEY!);
const router = express.Router();

interface CreatePaymentParams {
  admissionToken: string;
  consumerId: string;
  distributionId: string;
  distributionType: "queue" | "draw" | "auction";
  amount: string;
  currencyCode: string;
  items: Array<{ productId: string; variantId?: string; quantity: number; unitAmount?: string }>;
}

router.post("/create-payment-intent", async (req, res) => {
  try {
    const { admissionToken, consumerId, distributionId, distributionType, amount, currencyCode, items } =
      req.body as CreatePaymentParams;

    // 1. Validate admission with Fanfare FIRST
    const isValid = await validateAdmission({
      token: admissionToken,
      consumerId,
      distributionId,
      distributionType,
    });

    if (!isValid) {
      return res.status(403).json({
        error: "ADMISSION_INVALID",
        message: "Your access has expired. Please rejoin the experience.",
      });
    }

    // 2. Create Stripe PaymentIntent
    const paymentIntent = await stripe.paymentIntents.create({
      amount: moneyToProviderMinorUnits(amount, currencyCode),
      currency: currencyCode.toLowerCase(),
      automatic_payment_methods: { enabled: true },
      metadata: {
        admissionToken,
        consumerId,
        distributionId,
        distributionType,
        items: JSON.stringify(items),
      },
    });

    // 3. Return client secret
    res.json({
      clientSecret: paymentIntent.client_secret,
      paymentIntentId: paymentIntent.id,
    });
  } catch (error) {
    console.error("Payment intent creation failed:", error);
    res.status(500).json({ error: "Failed to create payment" });
  }
});
Step 2: Frontend Payment Form
import { loadStripe } from "@stripe/stripe-js";
import { Elements, PaymentElement, useStripe, useElements } from "@stripe/react-stripe-js";
import { useState, useEffect } from "react";

const stripePromise = loadStripe(process.env.NEXT_PUBLIC_STRIPE_KEY!);

interface CheckoutFormProps {
  admissionToken: string;
  consumerId: string;
  distributionId: string;
  distributionType: "queue" | "draw" | "auction";
  cart: CartItem[];
  totalAmount: string;
}

function PaymentForm({ onSuccess, onError }: { onSuccess: () => void; onError: (msg: string) => void }) {
  const stripe = useStripe();
  const elements = useElements();
  const [isProcessing, setIsProcessing] = useState(false);

  const handleSubmit = async (e: React.FormEvent) => {
    e.preventDefault();

    if (!stripe || !elements) return;

    setIsProcessing(true);

    const { error, paymentIntent } = await stripe.confirmPayment({
      elements,
      confirmParams: {
        return_url: `${window.location.origin}/checkout/complete`,
      },
      redirect: "if_required",
    });

    if (error) {
      onError(error.message ?? "Payment failed");
      setIsProcessing(false);
    } else if (paymentIntent?.status === "succeeded") {
      onSuccess();
    }
  };

  return (
    <form onSubmit={handleSubmit}>
      <PaymentElement />
      <button type="submit" disabled={!stripe || isProcessing}>
        {isProcessing ? "Processing..." : "Pay Now"}
      </button>
    </form>
  );
}

export function StripeCheckout(props: CheckoutFormProps) {
  const [clientSecret, setClientSecret] = useState<string | null>(null);
  const [error, setError] = useState<string | null>(null);

  useEffect(() => {
    async function createIntent() {
      try {
        const res = await fetch("/api/payments/create-payment-intent", {
          method: "POST",
          headers: { "Content-Type": "application/json" },
          body: JSON.stringify({
            admissionToken: props.admissionToken,
            consumerId: props.consumerId,
            distributionId: props.distributionId,
            distributionType: props.distributionType,
            amount: props.totalAmount,
            currencyCode: "USD",
            items: props.cart,
          }),
        });

        if (!res.ok) {
          const data = await res.json();
          if (data.error === "ADMISSION_INVALID") {
            setError("Your access has expired. Please return to the experience.");
            return;
          }
          throw new Error(data.message);
        }

        const { clientSecret } = await res.json();
        setClientSecret(clientSecret);
      } catch (err) {
        setError(err instanceof Error ? err.message : "Failed to initialize payment");
      }
    }

    createIntent();
  }, [props]);

  if (error) {
    return (
      <div className="payment-error">
        <p>{error}</p>
        <a href="/experience">Return to Experience</a>
      </div>
    );
  }

  if (!clientSecret) {
    return <div className="loading">Preparing payment...</div>;
  }

  return (
    <Elements stripe={stripePromise} options={{ clientSecret }}>
      <PaymentForm onSuccess={() => (window.location.href = "/checkout/success")} onError={setError} />
    </Elements>
  );
}
Step 3: Handle Stripe Webhooks
// routes/webhooks/stripe.ts
import Stripe from "stripe";
import express from "express";

const stripe = new Stripe(process.env.STRIPE_SECRET_KEY!);
const webhookSecret = process.env.STRIPE_WEBHOOK_SECRET!;

const router = express.Router();

router.post("/webhook", express.raw({ type: "application/json" }), async (req, res) => {
  const sig = req.headers["stripe-signature"]!;

  let event: Stripe.Event;
  try {
    event = stripe.webhooks.constructEvent(req.body, sig, webhookSecret);
  } catch (err) {
    console.error("Webhook signature verification failed");
    return res.status(400).send("Invalid signature");
  }

  switch (event.type) {
    case "payment_intent.succeeded": {
      const paymentIntent = event.data.object as Stripe.PaymentIntent;
      await handlePaymentSuccess(paymentIntent);
      break;
    }

    case "payment_intent.payment_failed": {
      const paymentIntent = event.data.object as Stripe.PaymentIntent;
      await handlePaymentFailure(paymentIntent);
      break;
    }
  }

  res.json({ received: true });
});

async function handlePaymentSuccess(paymentIntent: Stripe.PaymentIntent) {
  const { admissionToken, consumerId, distributionId, distributionType, items } = paymentIntent.metadata;

  // 1. Create order in your system
  const order = await createOrder({
    consumerId,
    items: JSON.parse(items),
    paymentIntentId: paymentIntent.id,
    amount: providerMinorUnitsToMoneyString(paymentIntent.amount, paymentIntent.currency),
    currencyCode: paymentIntent.currency.toUpperCase(),
  });

  // 2. Complete admission with Fanfare
  await completeAdmission({
    distributionId,
    distributionType: distributionType as "queue" | "draw" | "auction",
    consumerId,
  });

  // 3. Send confirmation email
  await sendOrderConfirmation(order);

  console.log(`Order ${order.id} created for payment ${paymentIntent.id}`);
}

async function handlePaymentFailure(paymentIntent: Stripe.PaymentIntent) {
  console.log(`Payment failed: ${paymentIntent.id}`);
  // Don't invalidate admission - allow retry
}
PayPal Integration
Step 1: Create PayPal Order
// routes/paypal.ts
import { PayPalHttpClient, OrdersApi, Order } from "@paypal/paypal-server-sdk";

const paypalClient = new PayPalHttpClient({
  clientId: process.env.PAYPAL_CLIENT_ID!,
  clientSecret: process.env.PAYPAL_CLIENT_SECRET!,
  environment: process.env.NODE_ENV === "production" ? "production" : "sandbox",
});

const ordersApi = new OrdersApi(paypalClient);

router.post("/create-paypal-order", async (req, res) => {
  const { admissionToken, consumerId, distributionId, distributionType, amount, currencyCode, items } = req.body;

  // 1. Validate admission
  const isValid = await validateAdmission({
    token: admissionToken,
    consumerId,
    distributionId,
    distributionType,
  });

  if (!isValid) {
    return res.status(403).json({
      error: "ADMISSION_INVALID",
      message: "Your access has expired.",
    });
  }

  // 2. Create PayPal order
  const order = await ordersApi.ordersCreate({
    body: {
      intent: "CAPTURE",
      purchaseUnits: [
        {
          amount: {
            currencyCode,
            value: amount,
          },
          customId: JSON.stringify({
            admissionToken,
            consumerId,
            distributionId,
            distributionType,
          }),
        },
      ],
    },
  });

  res.json({ orderId: order.result.id });
});

router.post("/capture-paypal-order", async (req, res) => {
  const { orderId } = req.body;

  const capture = await ordersApi.ordersCapture({
    id: orderId,
  });

  if (capture.result.status === "COMPLETED") {
    const customData = JSON.parse(capture.result.purchaseUnits![0].customId!);

    // Create order and complete admission
    await handlePayPalSuccess(capture.result, customData);

    res.json({ success: true });
  } else {
    res.status(400).json({ error: "Capture failed" });
  }
});
Step 2: PayPal Frontend
import { PayPalScriptProvider, PayPalButtons } from "@paypal/react-paypal-js";

export function PayPalCheckout(props: CheckoutFormProps) {
  const createOrder = async () => {
    const res = await fetch("/api/payments/create-paypal-order", {
      method: "POST",
      headers: { "Content-Type": "application/json" },
      body: JSON.stringify({
        admissionToken: props.admissionToken,
        consumerId: props.consumerId,
        distributionId: props.distributionId,
        distributionType: props.distributionType,
        amount: props.totalAmount,
        currencyCode: "USD",
        items: props.cart,
      }),
    });

    const { orderId } = await res.json();
    return orderId;
  };

  const onApprove = async (data: { orderID: string }) => {
    const res = await fetch("/api/payments/capture-paypal-order", {
      method: "POST",
      headers: { "Content-Type": "application/json" },
      body: JSON.stringify({ orderId: data.orderID }),
    });

    if (res.ok) {
      window.location.href = "/checkout/success";
    }
  };

  return (
    <PayPalScriptProvider options={{ clientId: process.env.NEXT_PUBLIC_PAYPAL_CLIENT_ID! }}>
      <PayPalButtons
        createOrder={createOrder}
        onApprove={onApprove}
        onError={(err) => console.error("PayPal error:", err)}
      />
    </PayPalScriptProvider>
  );
}
Error Handling
Payment Failures
function PaymentErrorHandler({ error, onRetry }: { error: PaymentError; onRetry: () => void }) {
  const getErrorMessage = (error: PaymentError) => {
    switch (error.code) {
      case "card_declined":
        return "Your card was declined. Please try a different payment method.";
      case "insufficient_funds":
        return "Insufficient funds. Please try a different card.";
      case "expired_card":
        return "Your card has expired. Please use a different card.";
      case "ADMISSION_INVALID":
        return "Your access has expired. Please return to the experience.";
      default:
        return "Payment failed. Please try again.";
    }
  };

  const canRetry = error.code !== "ADMISSION_INVALID";

  return (
    <div className="payment-error">
      <h3>Payment Failed</h3>
      <p>{getErrorMessage(error)}</p>

      {canRetry ? <button onClick={onRetry}>Try Again</button> : <a href="/experience">Return to Experience</a>}
    </div>
  );
}
Idempotency
// Ensure payments aren't processed twice
async function createPaymentWithIdempotency(params: CreatePaymentParams, idempotencyKey: string) {
  return await stripe.paymentIntents.create(
    {
      amount: moneyToProviderMinorUnits(params.amount, params.currencyCode),
      currency: params.currencyCode.toLowerCase(),
      metadata: {
        admissionToken: params.admissionToken,
        consumerId: params.consumerId,
        distributionId: params.distributionId,
        distributionType: params.distributionType,
      },
    },
    {
      idempotencyKey,
    }
  );
}

// Generate idempotency key from admission context
function generateIdempotencyKey(admissionToken: string, consumerId: string) {
  return `${admissionToken}-${consumerId}-${Date.now()}`;
}
Best Practices
1. Always Validate Before Payment
// Never create payment intent without validation
async function createPayment(params: CreatePaymentParams) {
  // ALWAYS validate first
  const isValid = await validateAdmission(params);
  if (!isValid) {
    throw new AdmissionError("Invalid admission");
  }

  // Then proceed with payment
  return stripe.paymentIntents.create(/* ... */);
}
2. Don’t Invalidate on Payment Failure
// On payment failure
async function handlePaymentFailure(paymentIntent: Stripe.PaymentIntent) {
  // Log the failure
  console.log("Payment failed:", paymentIntent.id);

  // DON'T complete/invalidate admission
  // User should be able to retry with same admission
}
3. Use Webhooks for Reliability
// Don't rely solely on client-side confirmation
// Always use webhooks for order creation
router.post("/webhook", async (req, res) => {
  // Webhook ensures order is created even if user closes browser
});
4. Monitor Payment + Admission Metrics
analytics.track("payment_attempted", {
  admissionToken,
  amount,
  distributionType,
});

analytics.track("payment_completed", {
  admissionToken,
  orderId,
  amount,
});
Troubleshooting
Payment Created But Admission Invalid
The admission may have expired between page load and payment submission:- Validate admission at payment creation time
- Show clear expiration countdown to users
- Handle gracefully with clear error messages
Double Charges
- Use idempotency keys
- Check for existing payments before creating new ones
- Use webhooks as source of truth
What’s Next
- Order Completion - Complete the order cycle
- Webhooks - Server-side event handling
- Error Handling - Comprehensive error management