Use a mobile WebView when your native app wants to reuse the web SDK journey UI while keeping checkout, account state, and navigation under native app control. The WebView should load a first-party page that integrates Fanfare. That page uses the React widget, web component, or core SDK, then sends high-level events to native code. Native code should pass admitted customers to your trusted checkout path without logging grants or placing them in URLs.

Architecture

Mobile WebView flow showing native app, WebView page, SDK view, JavaScript bridge, checkout, and backend. Takeaways:
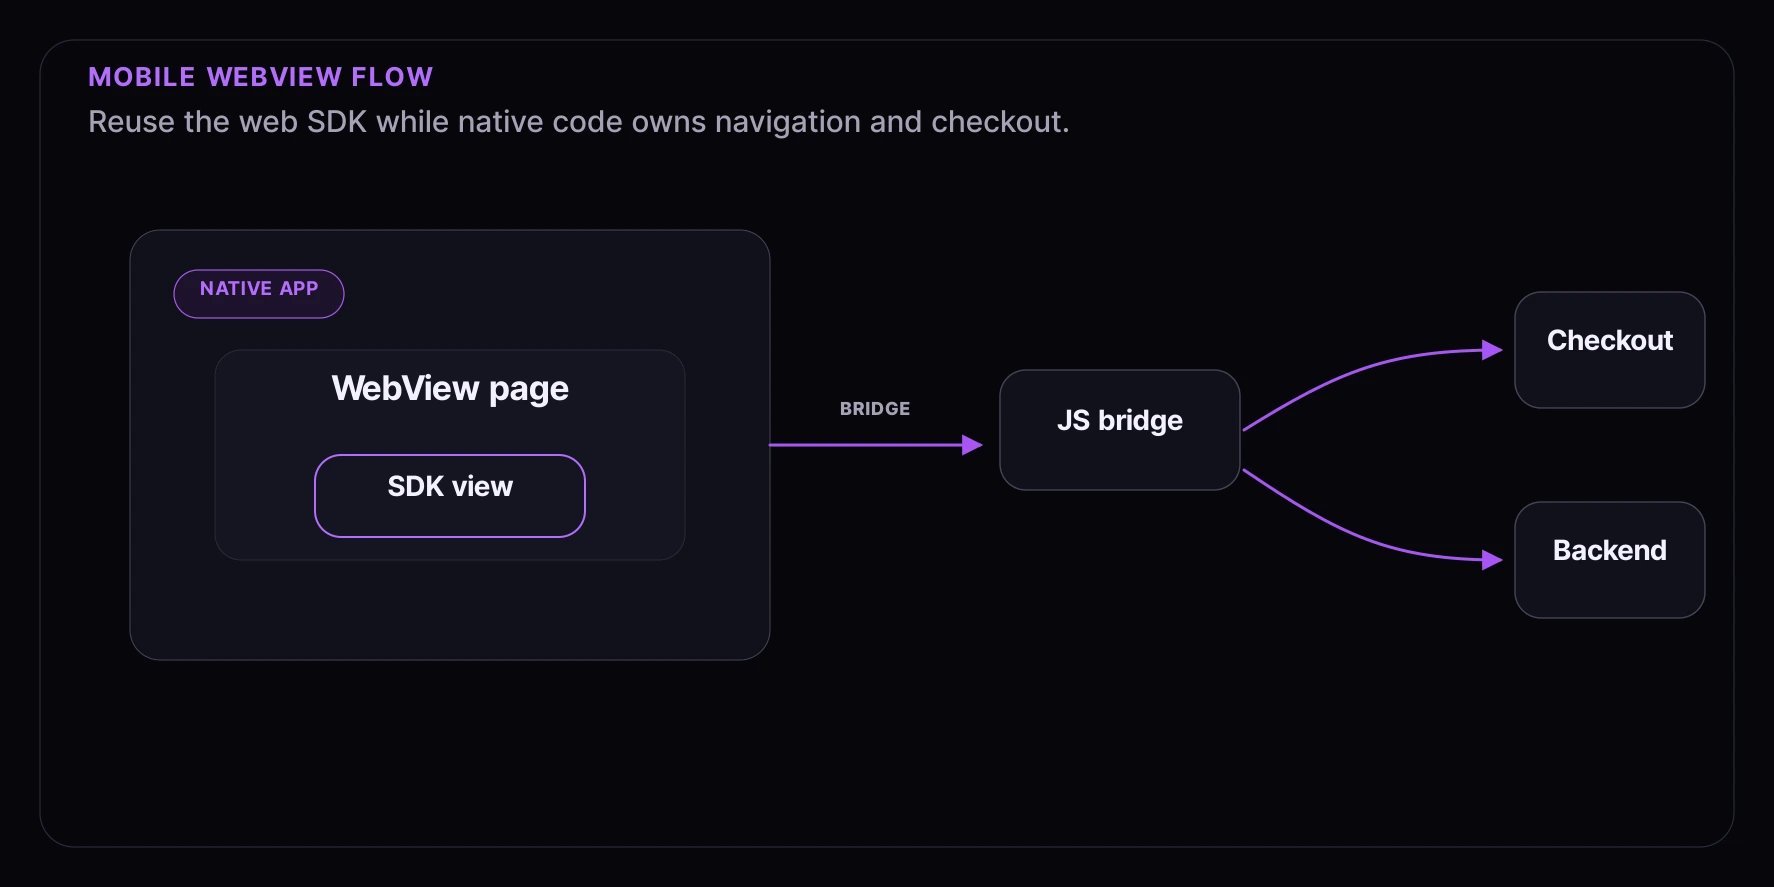
  • Keep the SDK in a normal browser page inside the WebView.
  • Use a narrow bridge message for admission, errors, and navigation.
  • Validate the admission handoff inside your app or backend before protected actions.

Web Page Example

The hosted page can use the React widget.
import { FanfareProvider, ExperienceWidget } from "@fanfare-io/fanfare-sdk-react";
import "@fanfare-io/fanfare-sdk-react/styles";

export function MobileExperiencePage() {
  return (
    <FanfareProvider
      organizationId="org_123"
      publishableKey="pk_live_123"
    >
      <ExperienceWidget
        experienceId="exp_123"
        autoStart
        onGranted={(admissionGrant) => {
          window.ReactNativeWebView?.postMessage(
            JSON.stringify({ type: "fanfare:granted", admissionGrant })
          );
        }}
        onError={(error) => {
          window.ReactNativeWebView?.postMessage(
            JSON.stringify({ type: "fanfare:error", message: error.message })
          );
        }}
      />
    </FanfareProvider>
  );
}
For a framework-agnostic page, use the web component events.
<fanfare-experience-widget experience-id="exp_123" auto-start></fanfare-experience-widget>

<script>
  const widget = document.querySelector("fanfare-experience-widget");

  widget.addEventListener("fanfare-granted", (event) => {
    window.ReactNativeWebView?.postMessage(
      JSON.stringify({ type: "fanfare:granted", admissionGrant: event.detail.grant })
    );
  });

  widget.addEventListener("fanfare-error", (event) => {
    window.ReactNativeWebView?.postMessage(
      JSON.stringify({ type: "fanfare:error", message: event.detail.error.message })
    );
  });
</script>
Do not send raw journey snapshots to native analytics. Send only the outcome or event your app needs.

React Native WebView

import { WebView } from "react-native-webview";

export function FanfareWebView() {
  return (
    <WebView
      source={{ uri: "https://shop.example.com/fanfare/mobile/exp_123" }}
      javaScriptEnabled
      domStorageEnabled
      onMessage={(event) => {
        const message = JSON.parse(event.nativeEvent.data);

        if (message.type === "fanfare:admitted") {
          startNativeCheckout({ admissionGrant: message.admissionGrant });
        }

        if (message.type === "fanfare:error") {
          showError(message.message);
        }
      }}
    />
  );
}
Use the WebView storage mode that matches your app’s session expectations. Test returning sessions, app restarts, and multiple tabs or windows where your platform supports them.

iOS WKWebView

For iOS, add a message handler and parse the same bridge payload.
let contentController = WKUserContentController()
contentController.add(context.coordinator, name: "fanfare")

let configuration = WKWebViewConfiguration()
configuration.userContentController = contentController
configuration.websiteDataStore = .default()
On the web page, post to the iOS bridge when present:
window.webkit?.messageHandlers?.fanfare?.postMessage({
  type: "fanfare:admitted",
  admissionGrant,
});
The native handler should pass the grant to your app-owned checkout flow and avoid persisting it longer than needed.

Android WebView

For Android, enable JavaScript and expose a narrow bridge.
webView.settings.javaScriptEnabled = true
webView.settings.domStorageEnabled = true
webView.addJavascriptInterface(FanfareBridge(::startCheckout), "FanfareNative")
webView.loadUrl("https://shop.example.com/fanfare/mobile/exp_123")
The page can call the bridge when it exists:
window.FanfareNative?.postMessage(
  JSON.stringify({ type: "fanfare:admitted", admissionGrant })
);
Keep the bridge allowlist small. Handle only the message types your native app owns.

Security And Privacy Checklist

  • Load only your first-party Fanfare page in the WebView.
  • Use HTTPS in production.
  • Keep publishable credentials in the web page and secret credentials on your server.
  • Send grants to your own app or backend, not to third-party logs.
  • Do not encode grants in deep links.
  • Show generic customer-safe error copy for gated or denied states.

Testing

  • Test a clean app install and a returning session.
  • Test WebView reload, app backgrounding, and network interruption.
  • Confirm bridge messages are handled once.
  • Confirm native checkout receives only the values it needs.
  • Confirm screenshots, crash reports, and analytics do not include grants or raw snapshots.
For broader test guidance, see Testing Your Integration.