

Available on Growth and above. Loyalty tiers require Pro. On Starter, creating and importing audiences is locked, while any audiences you already have keep gating sequences and can still be deleted.
For how audiences are built, refreshed, and evaluated during a drop, see Audiences and access codes. To attach an audience to a drop, see Add and gate sequences.
Before you start
- If you’re importing a CSV, make sure your file has a header row with a lowercase
emailorphonecolumn.
Create an audience from rules
- Open Audiences and select Create Audience.
- Enter a Name (and optionally choose an Audience Icon and Description).
- Under Match consumers where, select AND (customers must meet every rule) or OR (customers can meet any rule). This applies across all rules—nested combinations like
A and (B or C)aren’t supported. - Set your first rule—field, operator, and value—and select Add Rule for each additional condition.
- Select Create to save and return to the Audiences list.
- Between is inclusive of both values you enter.
- Guest shoppers never match audience rules.
The first rule starts as Email Equals with an empty value, and blank values aren’t blocked. Leaving Email Equals blank matches no customer who has an email address, whereas blank Email Not Equals or Email Contains matches everyone. Always enter a value or replace the default rule before selecting Create.
Enter Last order and Created at dates manually in
YYYY-MM-DD format (for example, 2026-03-01)—Fanfare reads them as the start of that day in UTC. There’s no rolling “last N days” filter, so update the date whenever you want to move the window forward.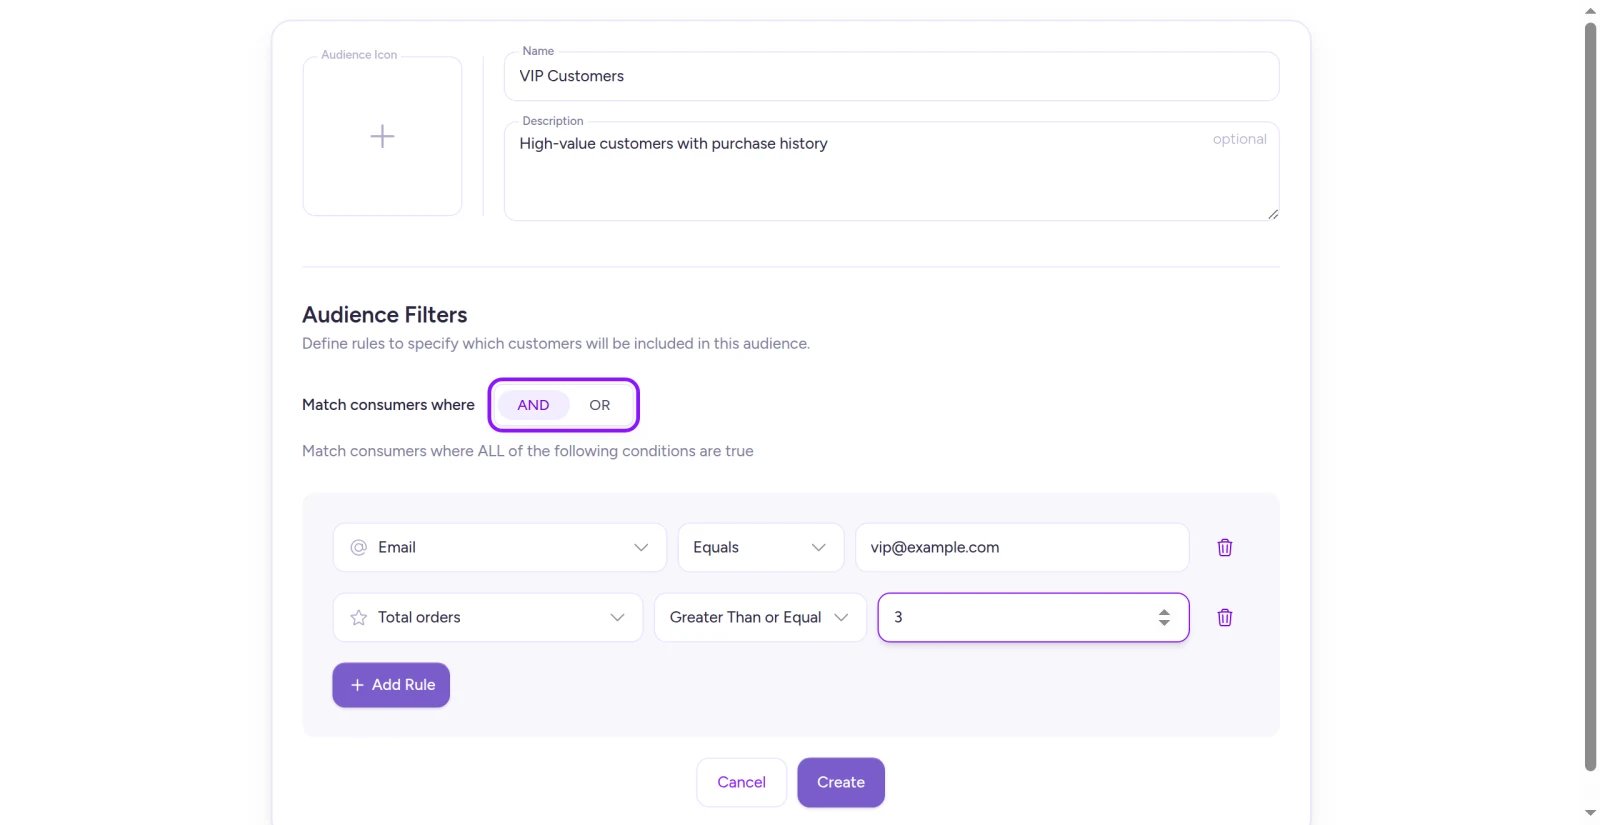
Your AND or OR selection applies across every rule in the audience.
Change the rules
- Open the audience and select Details.
- Edit the rules, Match consumers where, name, or description.
- Select Save in the action bar.
Refresh now
To rebuild a rule-based audience without waiting for its daily run, select Refresh now from the audience’s row menu or detail page—builds start within a minute. Refresh now isn’t available while a build is already queued or running, or while a drop gated by the audience is live (membership locks during live drops; see Audiences and access codes).Import a CSV file
- Open Audiences, open the Create Audience menu, and select Import CSV.
- Enter a Name (plus an optional Audience Icon and Description).
- Drop your
.csvfile onto the upload area (or browse for it), then select Next. - Review the sample rows on Preview Import and select Start Import.
.csvfile up to 100 MB with a header row.- Must include a lowercase
emailorphonecolumn (Emailisn’t recognized). - Optional columns:
fullName,phone,loyaltyLifetimePoints, andmetadata. Any other columns are ignored silently. - Preview Import shows up to 6 sample rows regardless of file size—it isn’t your total member count.
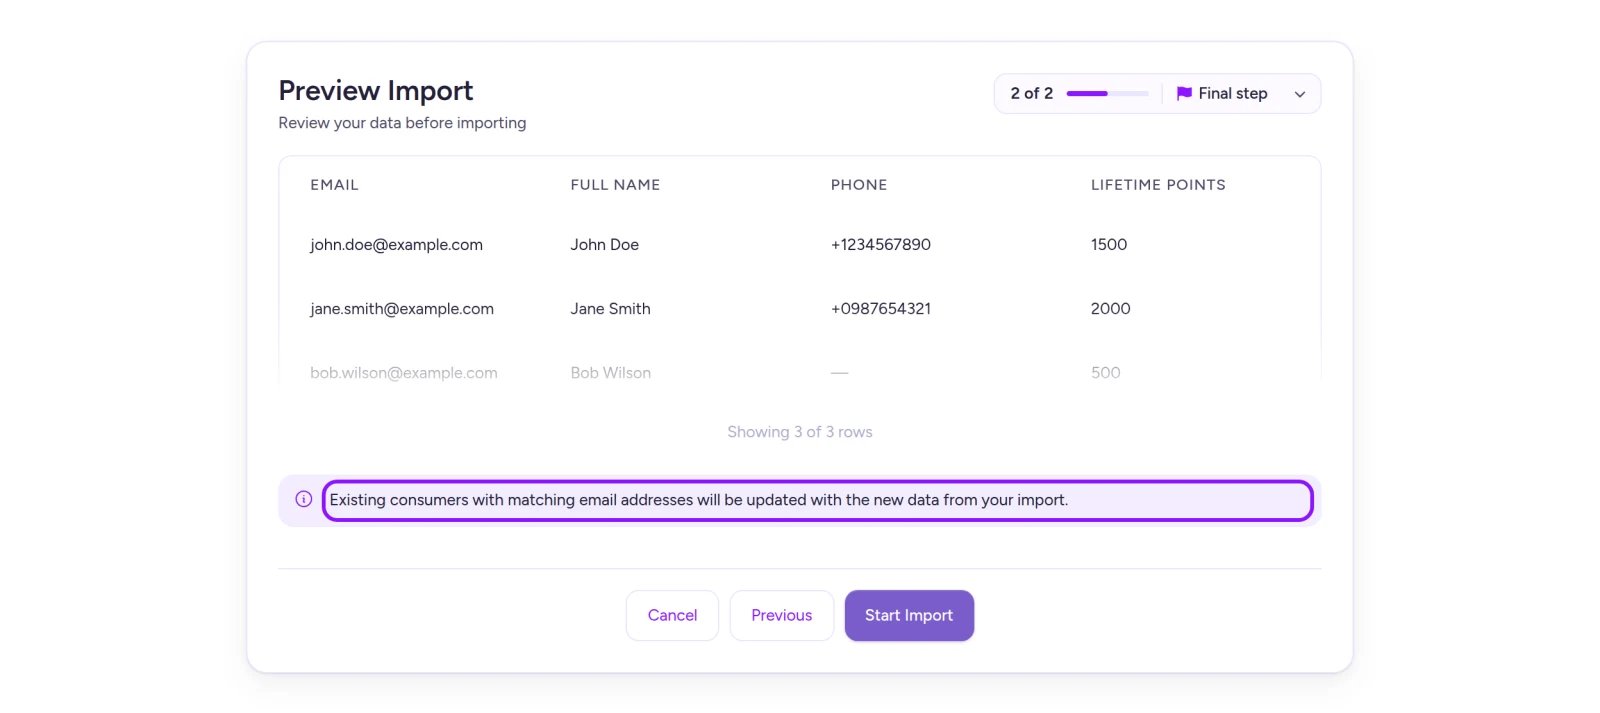
Review the sample rows and data-overwrite notice before starting your import.
Rows that were skipped
Open the imported audience and select Details to see how many rows succeeded. If any rows were skipped, expand the skipped-rows summary to see each reason and up to 5 row numbers (row 1 is the first data row below the header):- Needs an email or phone number
- Invalid email address
- Invalid phone number
- Email and phone belong to different customers
- Duplicate of another row
- Temporary problem, try importing again
- Couldn’t be imported
Klaviyo and Mailchimp lists
Klaviyo and Mailchimp lists can’t be imported directly from Audiences, even if you’ve connected those integrations. Export a CSV from your email platform, rename the email column header to lowercaseemail, and upload it with Import CSV (keep in mind that importing overwrites existing customer details and can clear SMS consent if a phone number changes).
Create loyalty tiers
Available on Pro and above.
- Open Audiences, open the Create Audience menu, and select Create Loyalty Tiers.
- Enter a Name and choose a Consumer Attribute: Loyalty balance, Lifetime points, Lifetime value, Total orders, Average order value, Activity score, Purchase frequency score, or Monetary score.
- Review the customer distribution chart and suggested tiers. (If all customers have the same value, select Add Tier to define ranges manually.) Drag the Tier Boundaries handles—or edit From and To directly—rename tiers, and add up to 10 tiers (at least 2 tiers are required to save).
- Select Create Tiers.
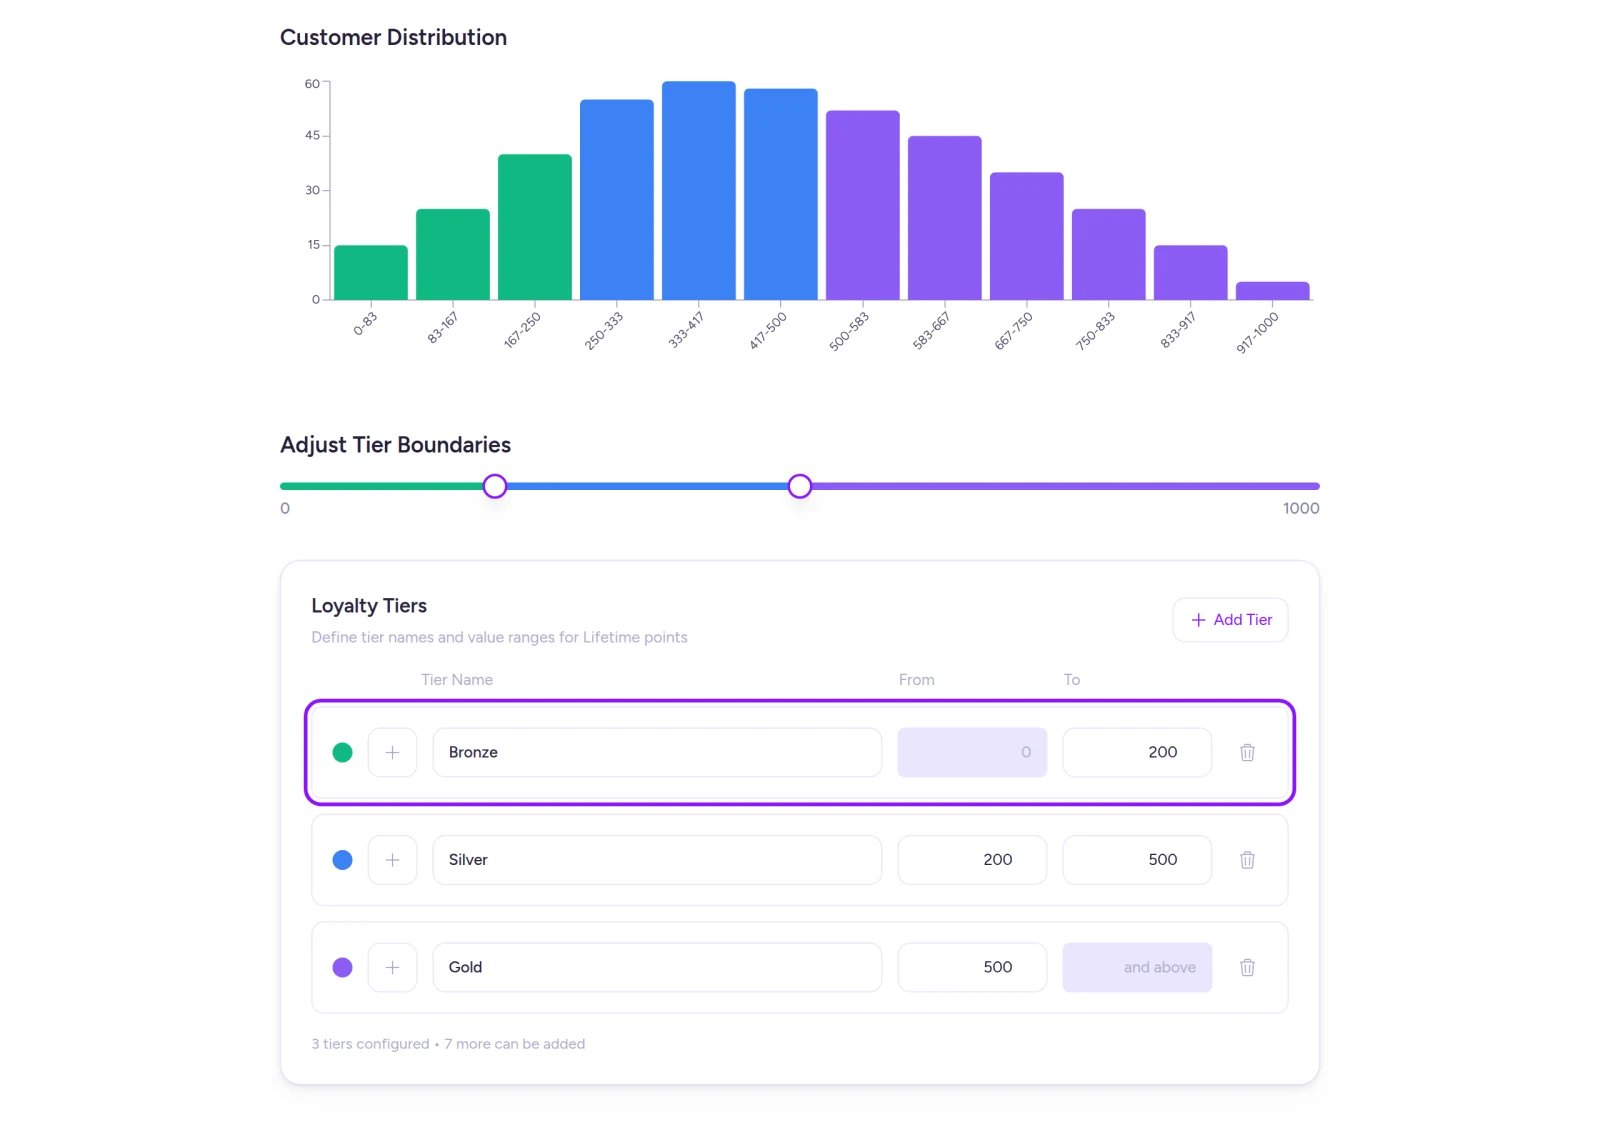
The first tier's From value is fixed at your lowest existing customer value.
Change tiers
Open the tier group, select Settings → Details, update tier names, boundaries, or count, and select Save.RFM segments
Every organization includes a built-in RFM Segments group (Champions, Loyal, At-Risk, New, and Lost). You can attach them to sequences right away or delete the whole group, though individual segments can’t be edited or deleted (and deleted RFM segments may reappear automatically).Read the Audiences list
- Type: Dynamic for rule-based audiences, or Static List for CSV imports.
- Members: Current member count (
—if the audience hasn’t built yet or couldn’t load). - Status: Import progress for CSV lists, or build state with Next build for dynamic audiences (see Audiences and access codes).
- Each loyalty tier group and the RFM Segments group appears as a single row.
Delete an audience
Select Delete from the row menu or on the audience’s detail page. You can’t delete an audience—or a tier group containing one—while it gates a sequence in any active, upcoming, or draft experience. Remove the audience from those sequences first, then delete it. Deleting an audience can’t be undone.Things to know before you go live
- Wait for the first build: A brand-new or newly imported audience won’t admit anyone until its initial build finishes. See Audiences and access codes.
- Watch the lowest tier boundary: The first loyalty tier’s From value locks to the lowest value your customers had at creation—not
0. If your lowest existing customer was above0, new customers starting at0won’t match any tier. - Loyalty-tier refresh timing: Tier audiences don’t rebuild daily and don’t offer Refresh now—they rebuild whenever you create or save changes to them, and automatically before a gated experience opens.
On Shopify
Audience tools work the same in the Shopify app. Shopify customer segments and lists can’t be imported directly—export a CSV from Shopify, rename the email column header to lowercaseemail, and upload it with Import CSV (keep in mind that importing overwrites existing customer details and can clear SMS consent if a phone number changes).
Troubleshooting
My CSV file was rejected
My CSV file was rejected
Make sure the file is a
.csv under 100 MB, includes a header row with a lowercase email or phone column, and has at least one customer row beneath the header.Some rows were skipped during CSV import
Some rows were skipped during CSV import
Check the skip reasons under Details (see Rows that were skipped). Because you can’t append rows to an existing static list—and each sequence takes one audience—fix your CSV, re-import the full file as a new audience, attach it to your sequence, and delete the old one.
I can't delete an audience
I can't delete an audience
It’s currently gating a sequence in an active, upcoming, or draft experience. Remove it from those sequences first (for a tier group, check every tier inside it).
Related
Audiences and access codes
How audiences are built, locked during live drops, and evaluated for each shopper.
Add and gate sequences
Restrict a sequence to members of an audience.
Invites, waitlist and access-code sends
Manage the invite email automatically sent to audience members.
Set up the next drop from this one
Build audiences from how customers engaged with a past drop.