

Save your Postal Address before scheduling your first drop—Fanfare requires a postal address to schedule email announcements or send audience invites.
Before you start
- You’re an organization admin in the Fanfare admin (other team members have read-only access to this page).
- To send from your own domain, have access to your domain’s DNS provider (or a teammate who can add DNS records for you).
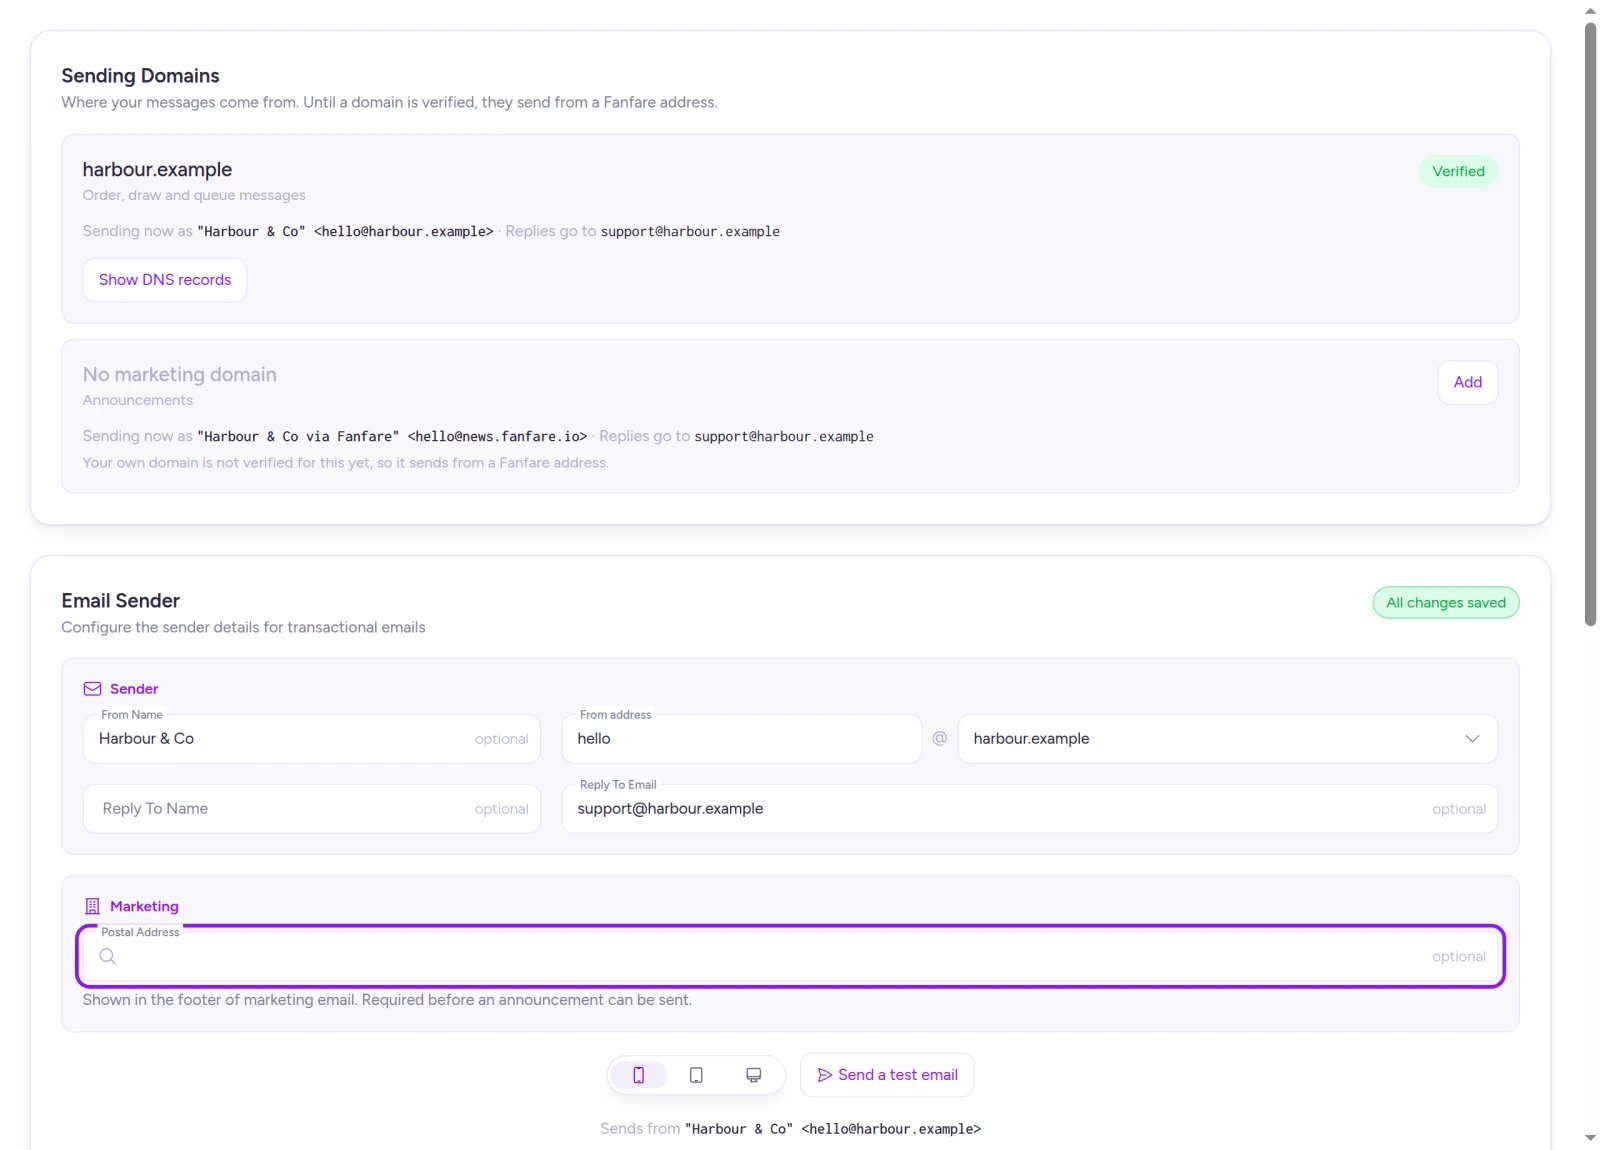
Manage custom sending domains at the top and configure your sender details and postal address below.
Set your sender details and postal address
- Go to Settings → Email Sender.
- Under Sender, set your From Name—the display name shoppers see in their inbox (defaults to your organization name).
- Enter your Reply To Email (labeled Replies go to before you verify a custom domain) and an optional Reply To Name so customer replies go straight to your inbox instead of Fanfare.
- Once your domain for order, draw, and queue messages is verified, enter the local part of your From address before the
@(your verified domain appears beside it). Before verification, select Verify a domain—see Use your own domain. - Under Marketing, enter your business Postal Address. This appears in the footer of every marketing email and is required for email announcements and audience invites.
- Select Save in the bottom bar.
Preview and test what customers see
The Sends from line below the form confirms the exact name and address your automatic emails currently use. While sending from a Fanfare address, your display name appears as “[From Name] via Fanfare”, and if Reply To Email is blank with no custom From address saved, replies route to Fanfare support. To inspect an email in your inbox, save any pending changes, then select Send a test email → Send. Fanfare sends a sample appointment confirmation to your sign-in email address using your saved sender details.Field reference
Sender changes apply to all upcoming emails as they send—allow a few minutes for updates to take effect.
Use your own domain
Send email from your own domain for stronger brand trust and inbox deliverability. The Sending Domains card splits your mail into two separate rows to protect transactional deliverability:- Order, draw and queue messages: Automatic transactional emails like sign-in codes, draw outcomes, and payment windows (What your customers see).
- Announcements: Scheduled marketing emails sent to customers who haven’t unsubscribed from marketing email.
news.yourbrand.com. You can’t add fanfare.io domains or a domain already registered on another email service account (use a dedicated subdomain instead).
Add and verify a domain
1
Add your domain
On the Sending Domains card, select Add on the row you want, enter your Domain (for example,
mail.yourbrand.com), and select Continue.2
Add the DNS records
Fanfare displays the DNS records to add—Type, Status, Name, and Value (plus priority where shown). Copy each record into your DNS provider’s dashboard.
3
Verify your records
Select Check now (available once per minute). DNS propagation can take up to a few hours—you can close the dialog while Fanfare checks in the background, and reopen it anytime via Show DNS records. Each record updates to Found, Not yet, Retrying, Failed, or Unknown.
4
Set your From address
Once verified, select Choose From address (or Done if your From address is already configured).
Domains that have never been verified and remain in Waiting for DNS or Failed for 7 days are released automatically so you can start fresh. Previously verified domains aren’t released automatically.
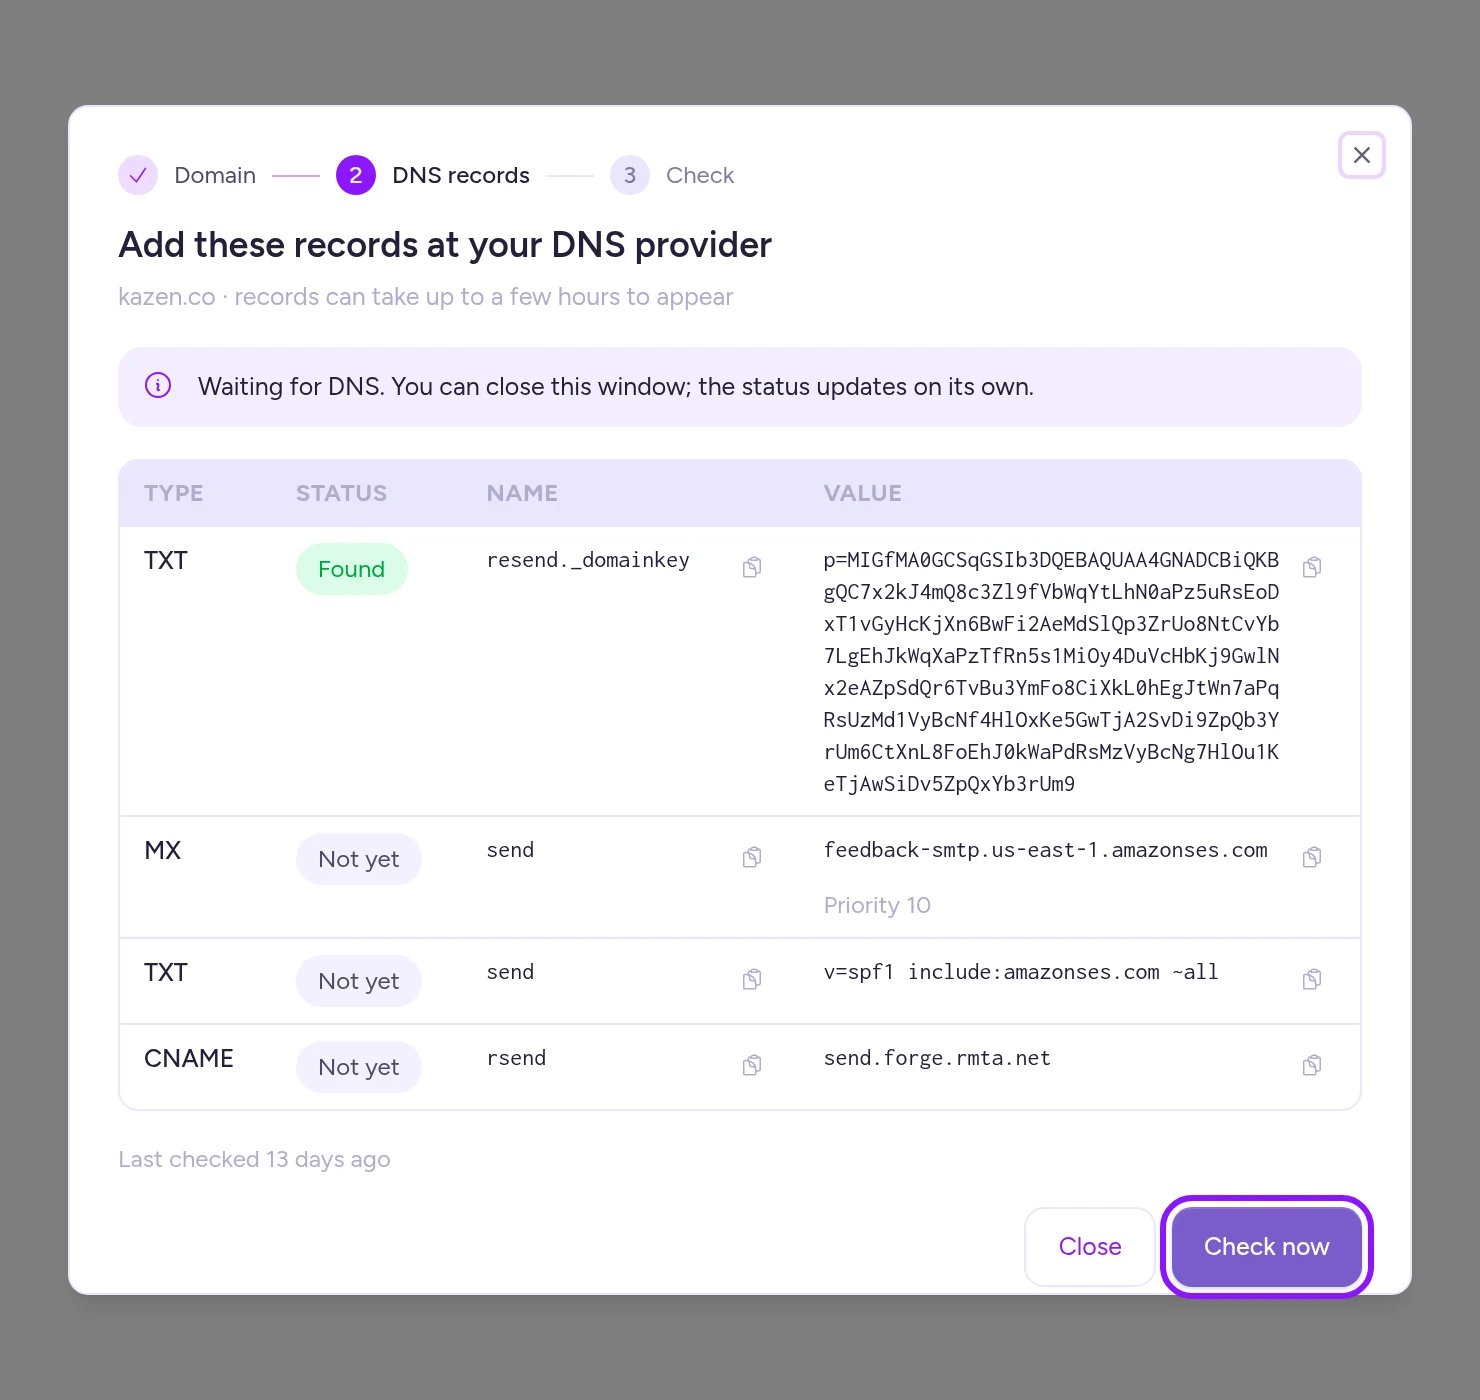
Copy each DNS record into your DNS provider, then select Check now to verify.
Choose the From address
Select Choose From address on the verification dialog or domain card:- Order, draw and queue messages: Enter the prefix before
@in From address, confirm your verified domain beside it, and select Save. - Announcements: Enter your preferred prefix in the Marketing Address dialog and select Save. Update it anytime with Change address, or select Use the default to fall back to your From address prefix on your announcements domain (or a Fanfare address if no From address is set).
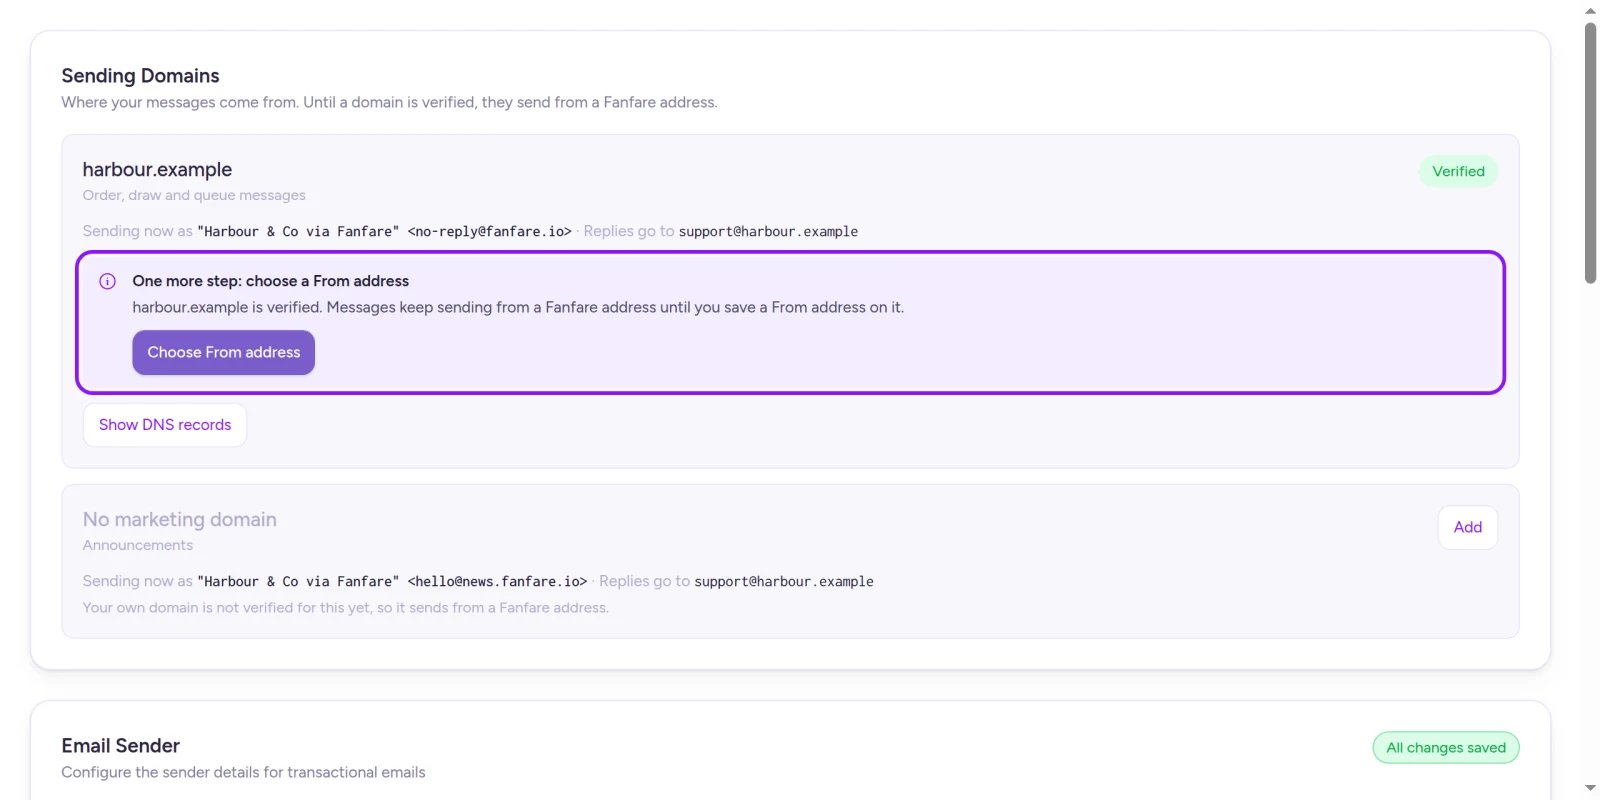
After DNS verification, save a From address on your domain to start sending from it.
Domain statuses
If a domain row warns that messages aren’t sending from your domain, an outbound email from your domain was rejected and automatically fell back to a Fanfare address so the customer still received it. Verify all DNS records show Found—if they do, contact Fanfare support.
Related settings
- Default messaging channel (email vs. SMS): Configure under Settings → Organization → Messaging. See Organization settings.
- SMS brand prefix: Configured in your Twilio connection under Integrations.
- Email logo and colors: Controlled by your brand in Set your brand.
On Shopify
- Any Shopify staff member with access to the Fanfare app can update sender settings and sending domains—admin-only restrictions don’t apply in the Shopify app.
- Send a test email sends to your Shopify staff account’s email address, which must be verified in Shopify first.
- Legacy links to the app’s email or messaging settings redirect here automatically.
Troubleshooting
DNS records still show Not yet after several hours
DNS records still show Not yet after several hours
DNS propagation typically finishes within a few hours. If records still show Not yet, compare each Type, Name, and Value at your DNS provider against Show DNS records (watching for duplicate domain suffixes added automatically by some DNS hosts), fix any mismatch, and select Check now.
My domain shows Needs attention or Failed
My domain shows Needs attention or Failed
Open Show DNS records and verify every required record is still active at your DNS provider. While you fix it, Fanfare automatically sends from a Fanfare address so customer emails aren’t dropped. A Failed domain can also be removed and added again.
My domain is verified, but emails still come from a Fanfare address
My domain is verified, but emails still come from a Fanfare address
You still need to save a From address on the verified domain. Follow Choose the From address.
An announcement says Didn't send because my postal address isn't set
An announcement says Didn't send because my postal address isn't set
Add your Postal Address on this page and select Save, then reschedule the announcement under Announcements.
Related
Announcements
Schedule email, SMS, and social announcements for your drop.
Invites, waitlist and access-code sends
Automatic audience invites, waitlist alerts, and access-code emails.
What your customers see
Every automated message customers receive throughout a drop.
Organization settings
Configure your default messaging channel and organization settings.