

Available on Growth and above. On Starter, the page editor opens read-only and publishing actions require an upgrade.
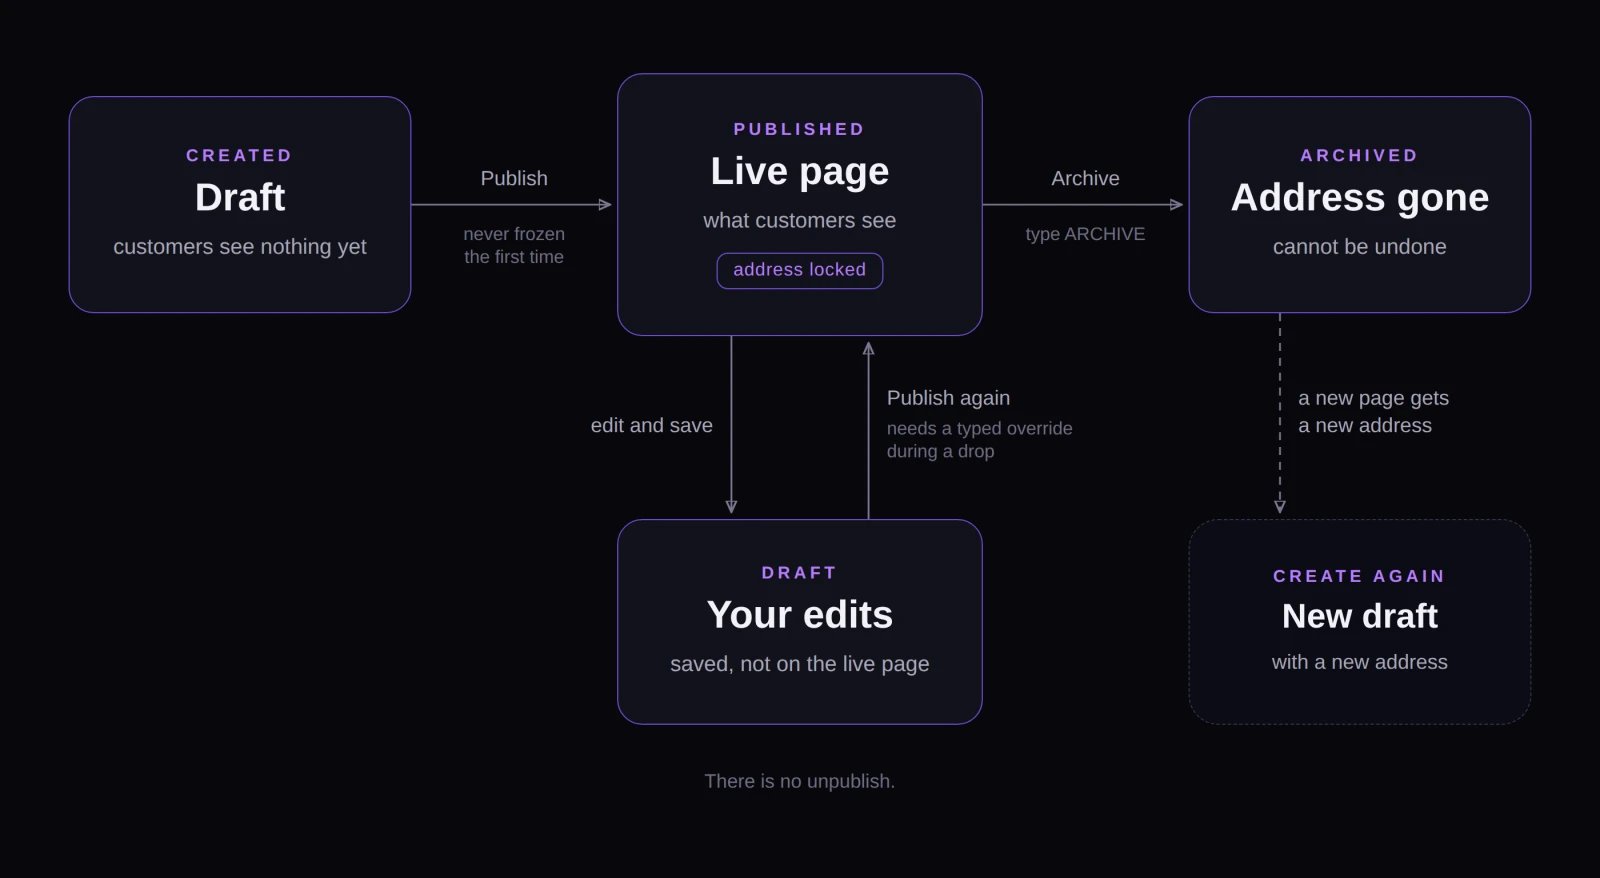
Page edits stay in draft until you publish, and archiving is the only way to take a published page down.
Before you start
- Your organization is on Growth or above.
- You’re an organization admin in the Fanfare admin. Team members can view and preview pages, but creating, editing, publishing, and archiving require an admin.
- Start from one of Fanfare’s built-in starters, or from a published organization template you built in Templates and widget designs.
Create the page
- Go to Experiences, open your experience, and select Design.
- On the Page card, choose how to start:
- Create Page copies your organization’s default page template directly into the experience (shown when a default template is set).
- Choose a template lets you preview and pick a published organization template or a Fanfare starter (Minimal, Lab, Poster, or Editorial), then confirm with Use template or Start from starter.
- Fanfare creates your page as a draft.
Edit content and styles
Content
- On the Page card, select Edit page to open the full-screen editor.
- Fill in your copy and media on the Content tab.
- Linked fields display “From [source]” (such as your product name or experience open time) and pull their values automatically.
- Select Sync from sources to refresh all linked fields with the latest data, or Unlink to freeze a field’s current value. Editing and saving a linked field also unlinks it.
- Select Save. If any field has a validation issue, hover over Save to see which fields need fixing.
Style
If your template includes style controls, open the Style tab to customize page-level colors (Fanfare’s starters use their built-in template fonts). Fields marked Brand · Primary inherit your organization’s Primary brand color automatically, while fields marked Template default keep the template’s color. Your experience’s Design tab summarizes any custom styles the page sets for itself right below the preview. See Set your brand and Brand, templates, and designs for how colors cascade.Add interactive blocks
Blocks add interactive features to your page, such as the entry widget, countdowns, live status badges, or customer polls.- Open the Blocks tab in the page editor to see each layout region in your template.
- Select Add block inside a region and choose a block. Each region lists only compatible blocks—larger areas support Customer Poll or the Fanfare Widget, while inline slots support Live Status or Countdown.
- Configure Region, Order, and the block’s settings, then select Save.
Each page supports up to 10 blocks and one entry widget (subject to a combined block-settings size limit).
Once a poll is published, its Live state panel displays live vote counts and lets organization admins Close poll, Reopen poll, or Reset poll. These actions take effect immediately without republishing—Reset poll clears all counts back to zero and allows previous voters to vote again, and can’t be undone.
Removing a block that’s already published discards its collected data on the next publish. Adding a new block later starts fresh.
Preview your draft
On the experience’s Design tab, select Preview on the Delivery status card to open Draft preview. Any required field that isn’t ready yet is filled with placeholder content and flagged in a banner. Preview links expire after 5 minutes—select Refresh anytime for a fresh link.Publish the page
1
Open the publish sheet
Save your latest draft in the editor, then select Publish… on the Delivery status card.
2
Review what's going live
Check each section of the publish sheet:
- Fill these in to publish: Required fields that must be completed before publishing.
- Still empty: Optional starter fields (such as dates, quantities, location, or rules)—empty fields stay hidden on the live page.
- Changed since last publish: Summary of updates since your last publish.
- Differs from the brand: Page-level style values overriding your brand.
3
Publish
Select Publish page. Fanfare confirms with Page published.
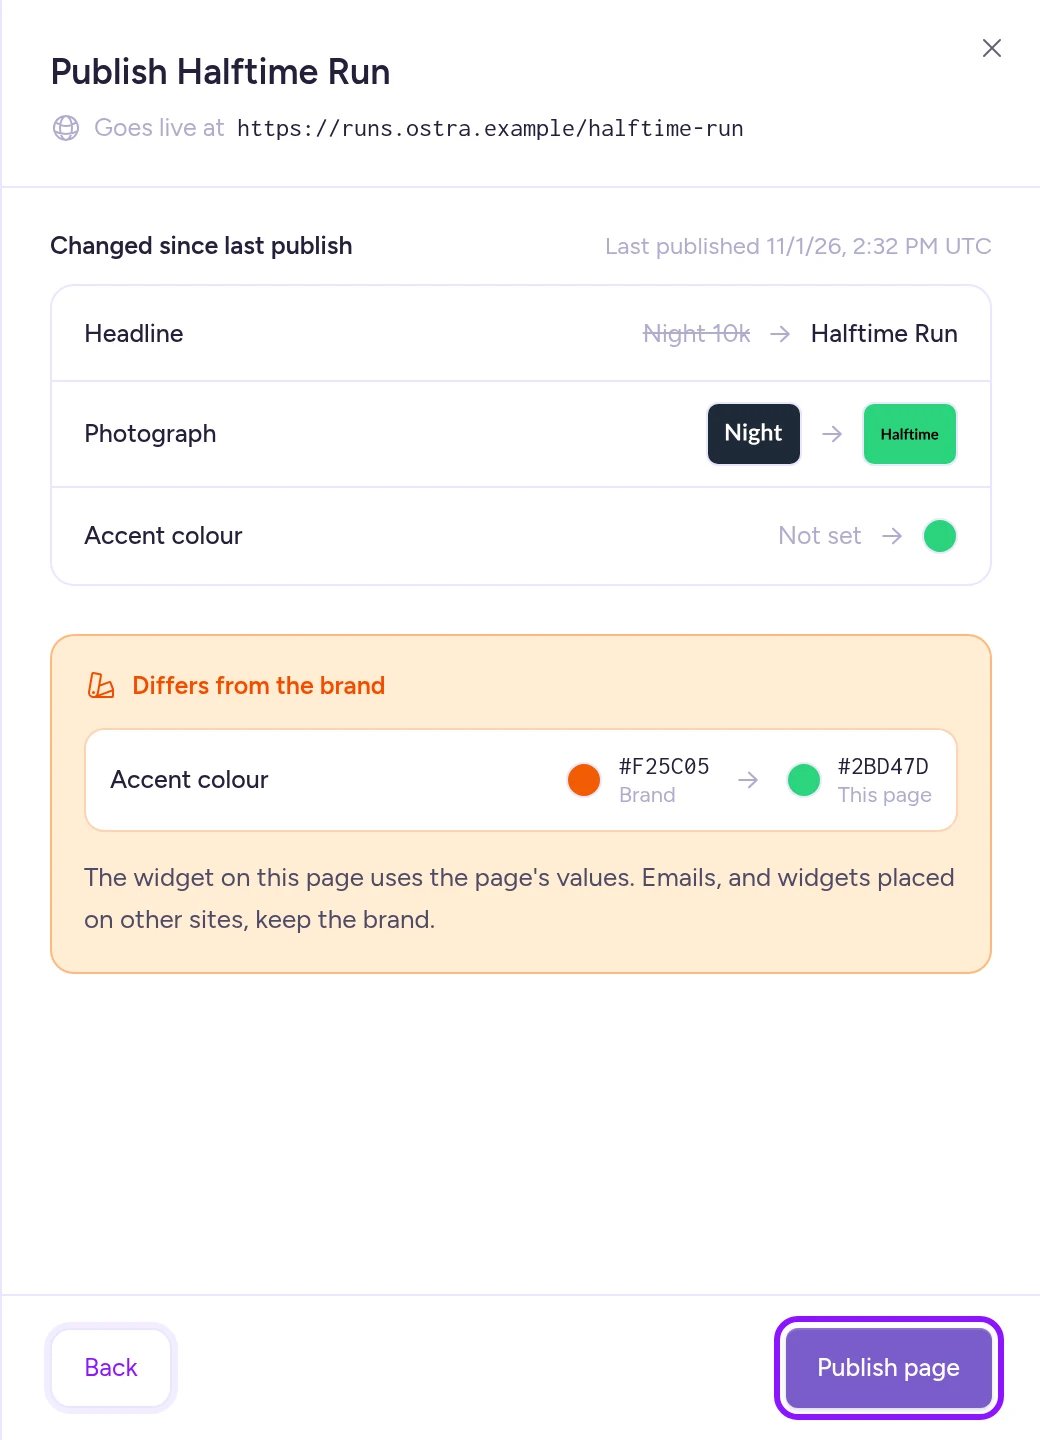
Review required fields, changes, and brand overrides on the publish sheet before going live.
- Publish with sample text?: Select Publish anyway if you’re happy with the starter wording, or Keep editing.
- Replace the starter’s sample facts: Sample dates, quantities, locations, or rules never publish as yours. Update them with your own details, or select Clear all sample facts to remove them and publish (if starter wording is also listed under Starter wording you can keep, check Publish this wording as it is first).
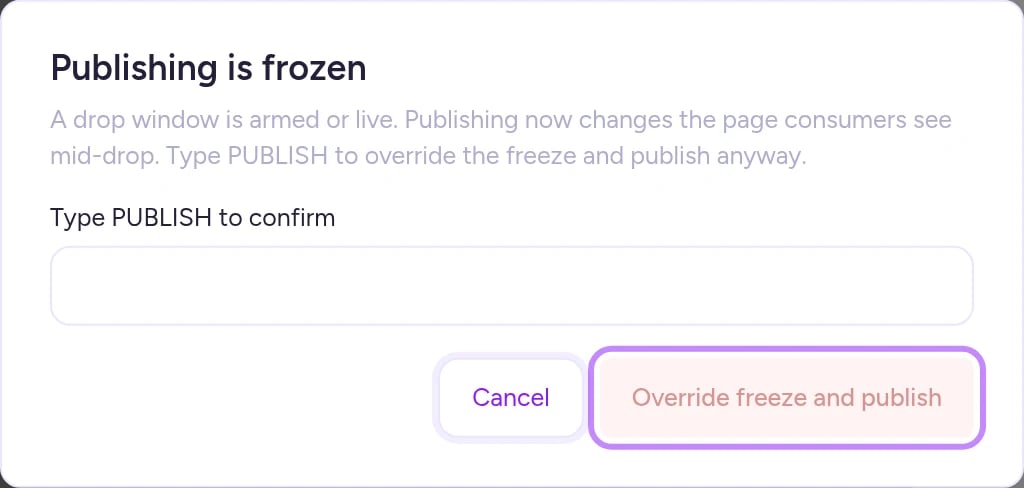
Republishing during a drop requires typing PUBLISH to override the freeze.
Check delivery and share the link
After publishing, the Delivery status card tracks rollout to Fanfare’s edge servers:
Once published, the Page card shows Live at with your URL, a copy button, and a button to open it in a new tab. The URL uses your organization’s Experience Subdomain from Organization settings.
Switch or reset the page design
- Switch templates: On the Page card, select Change template, pick a new template or starter, and confirm Switch design. Only your draft changes, and your draft’s blocks are replaced by the new template’s blocks. Review linked fields before publishing to make sure nothing cleared unexpectedly.
- Reset to template: If your page started from a published organization template, open the Page card’s actions menu (
…) and select Reset to template → Reset to rebuild your draft from the latest template version (this replaces your draft’s blocks). - Manage unused designs: Previous customized designs for this experience move to Unused designs (unedited template copies are cleaned up automatically). From there you can select Use again, Save as organization template (creates a Draft template in Design Studio), or permanently Delete them.
Take the page down
Hosted pages don’t have an unpublish button. To take a page offline while the experience continues, archive it:- On the Page card, open the actions menu (
…) and select Archive page. - If the page has ever been published, type
ARCHIVEand select Archive page.
When the drop ends
Even after every distribution closes, your URL continues serving the published page until you archive it, deactivate a distribution, or delete the experience. If you deactivate the experience—or even a single sequence or distribution—or delete the experience, visitors see a branded ended or canceled screen instead (including for anything else in the experience that’s still running), with a link to the Website configured in your organization settings. See Stop a drop and What your customers see.Things to know before you go live
- Some updates go live without publishing: Linked fields (product details, experience name and times, organization details) refresh automatically after their source changes, sometimes after a brief delay. Brand updates, Experience colours, and widget design changes also update live pages right away. See Set your brand and Templates and widget designs.
- No third-party scripts: Custom tracking tags and pixels can’t run on Fanfare-hosted pages.
- Embedding in an iframe: To display a hosted page inside an iframe on another website, add that domain under Settings → Embedding. See API keys and embedding.
- Downgrading to Starter: Published pages continue serving customers. You can still preview, archive, and close or reopen live polls, while editing and republishing require Growth or above.
On Shopify
- Any Shopify staff member who can open the Fanfare app can create, edit, publish, override freezes on, and archive hosted pages—admin-only restrictions don’t apply in the Shopify app.
- For products imported from Shopify, Delivery status lets you know if Fanfare is still copying the product image from Shopify (or if the image copy failed).
Troubleshooting
This page was changed somewhere else
This page was changed somewhere else
Another tab or teammate saved a newer version of the draft after you opened the editor. Reload the page to pull the latest draft, then reapply your edit.
Live at shows only /slug instead of the full URL
Live at shows only /slug instead of the full URL
The page couldn’t load your organization’s subdomain. Reload the page—if it persists, contact Fanfare support.
The countdown label names the wrong drop type
The countdown label names the wrong drop type
Pages created from earlier starter versions can include static countdown wording like “Draw opens in”. Update Countdown label before opening and Countdown label while open on the Content tab, save, and publish.
Related
Brand, templates, and designs
How brand, templates, and page overrides layer together.
Templates and widget designs
Build reusable page templates, set defaults, and style widgets.
Run it on your own site
Embed the Fanfare widget directly on your own website.
What your customers see
Every customer screen and message across the drop lifecycle.